Greetings from the Canadian Rockies....via Nevil,


I have been lazy in the upkeep of my side of the blog for sure. I hope to remedy this now. Please bear with me as this post will be a bit technical but if you're reading this because you want to prep your DR650 there might be some useful info.
Christmas came and went in the blink of an eye and before long I was back working on the DR. The first task was to fit the bash plate, new handlebars and MSR brush guards.

My choice of hand shield was basically the biggest lump of plastic I could find to bolt onto the brush bars. MSR provide such a thing and so far they have certainly managed to keep the cold winter winds from freezing my hands.

The engine bash plate was easy enough to install and during this process I drained the oil, installed a magnetic drain plug and put some cheap oil back in. Why cheap oil? Basically i will run the engine for about 1000 kms and drain the oil out again to see what state it's in. By inspecting the magnetic drain plug I should get an idea of how the engine is wearing.
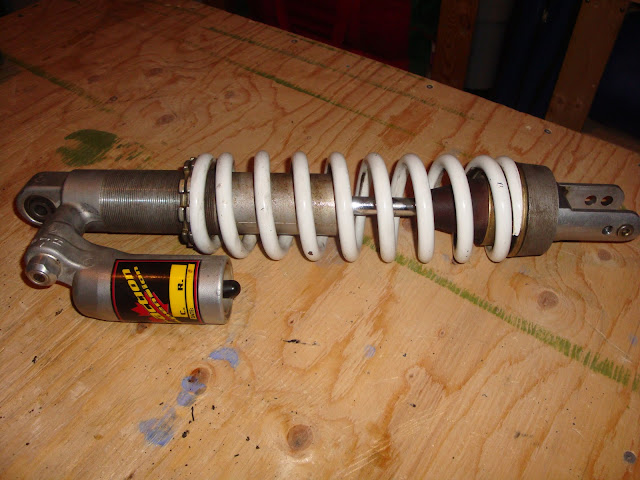
Rear shock absorber. There are many products out there for the DR. I chose to go with a Cogent Dynamics rebuild and restore the bike to its full factory height in the process. The turnaround time for the rebuilt shock was a couple of weeks and pretty soon I was back in the workshop installing a shiny new item that I hope will stand the punishment of Mongolian roads and the Road of Bones with me and luggage on board.

Old shock absorber...note the two holes at the base on the right. This is the factory way of lowering the back end of the DR.

Shiny, new and with some extra adjustments added in lovely anodized red. Basically it was fitted with a new gas bladder, cogent's own internals and an 8.1 Eibach spring. According to Ric at Cogent this will be good for me (185 pounds) and around 70 pounds in luggage, tools, tyres etc.
Front forks. Hmmm.....what to do. The front end is way too squishy and dives heavily under normal braking. I've spent a lot of time on forums recently, especially the DR forum (DRRiders) and there appears to be a growing fanbase of Intiminator users out there. Ricor Racing Intiminators are basically a valve system that one can install without having to remove or drill out the dampening rod. Just install under your spring on top of the damper rod and screw it all back together again. Fill with 5W oil and ride. Actually it's not quite this easy because you really should set up your preload according to your preference by manufacturing and sizing up spacers on top of your springs too. Many people claim that you don't need to replace your stock front springs for this either. I will give this a try....watch this space for a report.
Tool tube. I built this a few weeks ago from some 3 inch PVC pipe and two pressure bungs.The idea was to fit it in place of the existing stock tool tube to gain more carrying capacity.

Everything was going well until my mate Grif bought me a new shiny alloy tool tube for doing some renovation work at his house. I will be fitting this new item very soon!

Stock Suzuki tool tube at top. My home made tube in the middle and the cavernous new storage at bottom!
Grip Heaters. Yup... I need them. For the longest time I considered Oxford slip on heaters but in the end I went with Happy Trail's kit. This includes a set of heaters, a toggle switch all the wiring and a free set of gel grips. I also elected to buy an aluminium throttle tube to replace the plastic one on the DR. I did this for two reasons, 1), I didn't want the new heaters melting the plastic of the stock tube and 2), Suzuki glue their grips on with REALLY strong glue. I'd rather lose my sanity in a more complicated way...not wrestling with a set of cheap grips!

Toggle Switches. The heated grips come with a toggle switch to control them. I also want to install a toggle switch that will cut the power to the headlamp and save generator time when I need to run the heaters and charge stuff like camera batteries etc. There's not a lot of room behind the small fairing for this so I've elected to mount a small plate to the left handle bar clamp that will contain these switches. see below.

I have a feeling I'll be revising this design but for now it will do.
Rear wheel ...Especially the Sprocket bearing. The DR is famous for eating the rear sprocket bearing. Basically it's a combination of a nasty OEM bearing that only has one dust seal on one side and the cush-drive rubbers wearing and getting sloppy. My advice...replace the rubbers with new and install a bearing that has a dust seal on both sides. Don't forget to pop the dust seal on one side, pack it full of grease and replace the seal again. Bearing factories are very miserly on their grease application.

So far so good. I did actually manage to get out for a couple of rides near the beginning of February. At this time of the year in the Canadian Rockies that's a real bonus I can tell you! So far I have only racked up about 130kms but spring is on the way!

I am expecting a large order from ProCycle soon that includes a windshield, lower chain roller bearing assembly, intiminators, gel seat & cover kit, fork brace and back light assembly.
Future purchases will include a centre stand, 30 litre Safari fuel tank and happy trail panniers and racks.
That's about it for all the technical stuff for a while. I promise there will be some more stuff on travel planning, medical jabs and gear testing soon :)
Kindest regards
Nevil
No comments:
Post a Comment